Bootstrap a SaaS Project in Minutes with Next.js, Supabase, and Stripe

TL;DR
Overview
Bootstrap a SaaS with a modern tech stack built to move quickly. In just a few minutes you can deploy a SaaS project that includes:
- Supabase — Postgres database & user authentication
- Stripe — Checkout, subscriptions, and customer portal
- Tailwindcss — CSS framework
- shadcn/ui — Prebuilt accessible components
- Webhooks to automatically synchronize Stripe with Supabase
- Stripe fixture to bootstrap product data
- Supabase migrations to bootstrap and manage your db schema
- Prebuilt pages that are responsive, performant, and accessible
- Animated button borders! Now your site can look cool without nerds saying you shipped too late 😄
Get Started
Step 1: Setup Supabase
- Go to supabase.com and create a project
- Go to Project Settings → Database → Database password and click reset database password then click generate a new password. (I know you already made one, but this fixes a bug with their CLI where it doesn’t like special characters in the password)
- Save this password somewhere, you can’t see it after closing the box
Step 2: Setup Stripe
- Go to stripe.com and create a project
- Go to Customer Portal Settings and click the Active test link button
Step 3: Deploy
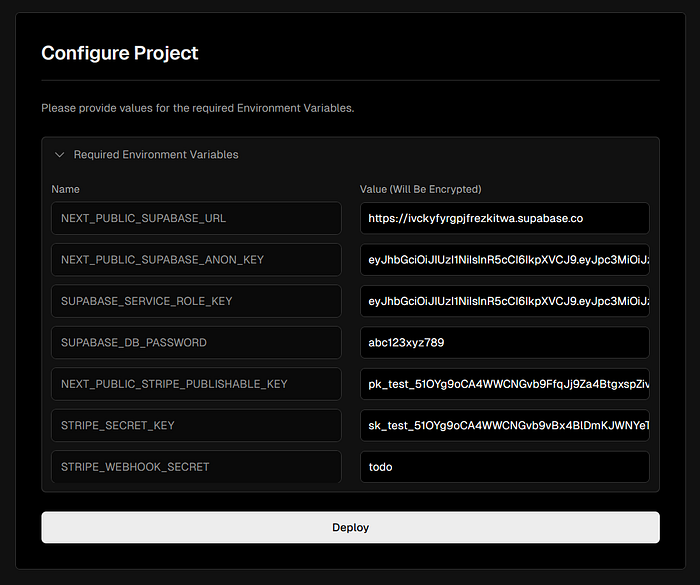
- Click this link: Deploy to Vercel
- On the form create a new repo and add the Supabase integration
- Add the environment variables that you have available. For the stripe webhook secret just put any value — we will come back to update this after configuring the webhook
- Click Deploy
- While you wait, clone your new repo and open it in your code editor. Then create a file named
.env.local. Copy and paste the contents of.env.local.exampleinto this file and add the correct values. They should be the same values you added in above.
Step 4: Stripe Webhook
- After deploying go to your Vercel dashboard and find your Vercel URL
- Next go to your Stripe dashboard, click Developers in the top nav, and then the Webhooks tab
- Add an endpoint. Enter your Vercel URL followed by
/api/webhooks - Click Select events
- Check Select all events
- Scroll to the bottom of the page and click Add endpoint
- Click to Reveal signing secret and copy it
- Go to your Vercel project settings → Environment Variables
- Update the value of the
STRIPE_WEBHOOK_SECRETenv with your newly acquired webhook secret. Press Save
Step 5: Run Supabase Migration
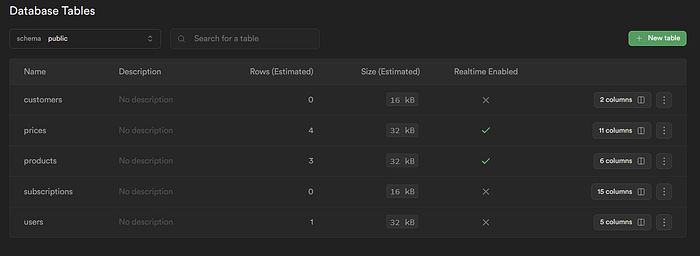
Now we’re going to run the initial Supabase Migration to create your database tables.
- Run
npx supabase login - Run
npx supabase init - Open your
package.jsonand update bothUPDATE_THIS_WITH_YOUR_SUPABASE_PROJECT_IDstrings with your supabase project id - Run
npm run supabase:link - Run
npm run migration:up
💥your new database is now ready to go!
Step 6: Run Stripe Fixture
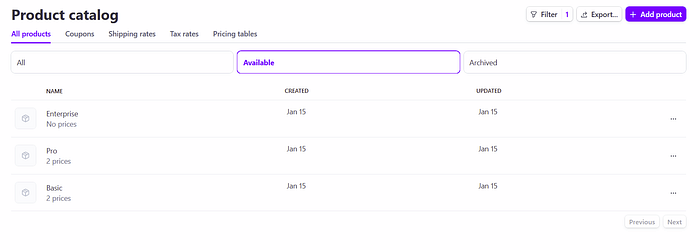
Stripe fixtures are an easy way to configure your product offering without messing around in the Stripe UI.
- Install the Stripe CLI. For Macs simply run:
brew install stripe/stripe-cli/stripe(assumes you have Homebrew, if not go install it) - Run
stripe fixtures ./stripe-fixtures.json — api-key UPDATE_THIS_WITH_YOUR_STRIPE_SK
(make sure to update the command with your Stripe SK)
💥 your new Stripe products are now ready to go! Not only that, but when changes are made in Stripe the webhook calls the API that was deployed. The API handler takes the data changed in Stripe and synchronizes it with your Supabase database.
Step 7: Last steps
- Do a Search All in your code editor for
UPDATE_THIS_and update all instances with the relevant value (except for .env.local.example!) - Delete the
delete-medir
Step 8: Check it out!
🎉 You did it! You should be able to look in your Stripe dashboard and see your products, and you should also see the same data has been populated in your Supabase database. Now let’s test everything.
- Run
npm i - Run
npm run dev - Go to the local app and click Get started for free — this will take you to the login page
- We haven’t configured auth providers, so for now click Continue with Email and submit your email address
- Click the link sent to your email and you’ll be redirected back to your app — authenticated
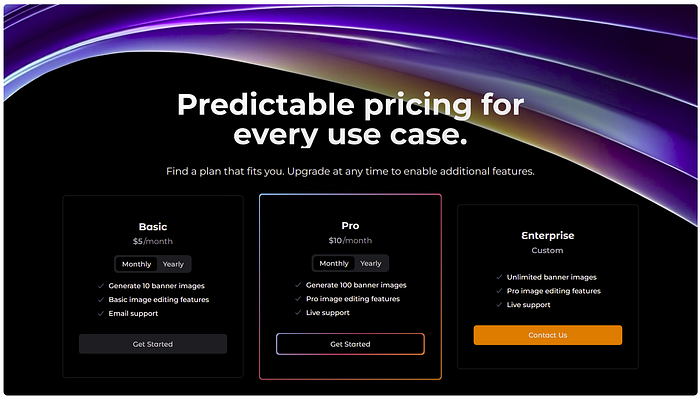
- Click Get Started on one of the plans. This will take you to a Stripe checkout page (In test mode)
- Enter
4242424242424242as your credit card number. Fill out the rest of the form with any valid data and click Subscribe - You’ll then be redirect to the Account page where you can see your active subscription
- Click the Manage your subscription button to be redirect to the Stripe customer portal where you can manage your subscription
Conclusion
After a short setup you have a working database, configured stripe products, checkout, subscriptions, customer portal, webhooks to synchronize Stripe and Supabase, and a beautiful codebase with a modern tech stack. Now you can focus on building your product.
Go to the repo for guides on coding in your new codebase, and here are some links to learn more:
- Learn more about setting up Auth providers
- Learn more about Supabase Migrations
- Learn more about shadcn/ui components
- Learn more about theming with shadcn/ui
- Learn more about the Tailwindcss theme config
If you need help with the setup, or developing in the codebase, feel free to reach out to me on Twitter @kolbysisk — I’m always happy to help. ❤️